National Instrument LabVIEW has grown and evolved a lot since its introduction in 1986 for Macintosh. Over time, NI has taken their graphical programming paradigm to most of the Operating systems, to real-time, to FPGAs and now to the web. Yes today you could build a neat Web Page quickly with your LabVIEW knowledge using NXG WebVI
- Prerequisite: No HTML, CSS, Javascript knowledge required. It’s pure LabVIEW
Below ‘Math web game’ is purely built using NI NXG WebVI
How to do this?

WebVI develop, deploy and host
Develop a Web page using WebVI
Introducing WebVI
- WebVI is like a normal VI in NXG where a developer can build web pages using the available and web supported LabVIEW front panel objects and block diagram functions.
- WebVI can be translated into an HTML+CSS+Javascript function and can be run on the browser or it can also be run within the NXG ADE
- WebVI is run on a web browser using an open source runtime engine (vireo)
Steps to develop a Web page
- Open LabVIEW NXG
- Select ‘Building Applications’ –> ‘Getting Started with Web Application’ from the lessons – This will be a good starting point as this comes with default application and a WebVI in the project with System Designer configured already
- Open WebVI – This has Front Panel, Block Diagram, Icon and HTML pages. We will skip the HTML and Icon page for now
- Develop the program using the Front Panel and Block diagram using the functions available (National Instruments will be coming up with more functions as NXG matures)
- As an example program: I have the screenshots of the Front panel and block diagram of the game below
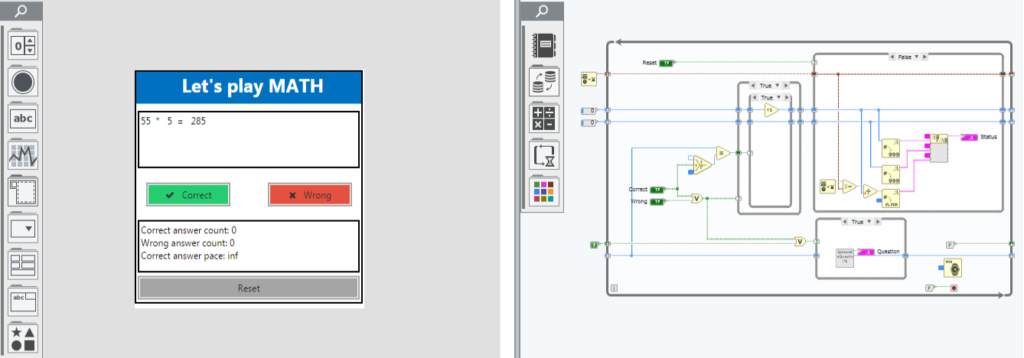
- Once the program is ready, the user can run the WebVI in the LabVIEW NXG ADE to test the behavior
- Now we have our WebVI ready to build!
Building web application using System Designer
Introducing System Designer
- System Designer is an important component of the LabVIEW NXG ADE and it comes by default with every NXG project
- System Designer = NI Measurement and Automation Explorer++ and Software Library and Builds Manager ++. It combines both hardware and related software management in one place
- System Designer is the place where we will detect, organize, document and manage the hardware system using the two views – Live and Design View. It gives the graphical representation of the system.
- Live View – Automatically detect the hardware connected to the machine and reflect the state of the system
- Design View – Let’s say I don’t have all the hardware available for my system but still I can use design view to simulate/design the system with actual and simulated hardware and also build my software components
Steps to build a Web application
- All we need to do is – Go to the system designer in the project, In Design View we will find a web server with the application that contains our WebVI.
- Right Click on the application and choose build
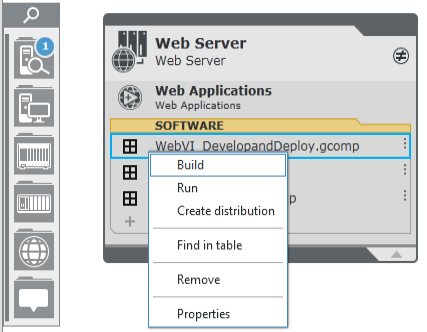
- The build status can be seen in the status bar (Make sure the WebVI is not running in the ADE when we try to build the application)

Host using NI Web Server
Introducing NI Web Server
- NI Web Server will serve the browser with web pages requested
- Users can host any web pages using NI Web Server once NI Web Server is configured in the server machine
Configure NI Web Server
- To Configure –> Open NI Web Server Configuration window –> Go to Summary Page –> Open ‘Run Guided setup to select preset settings’
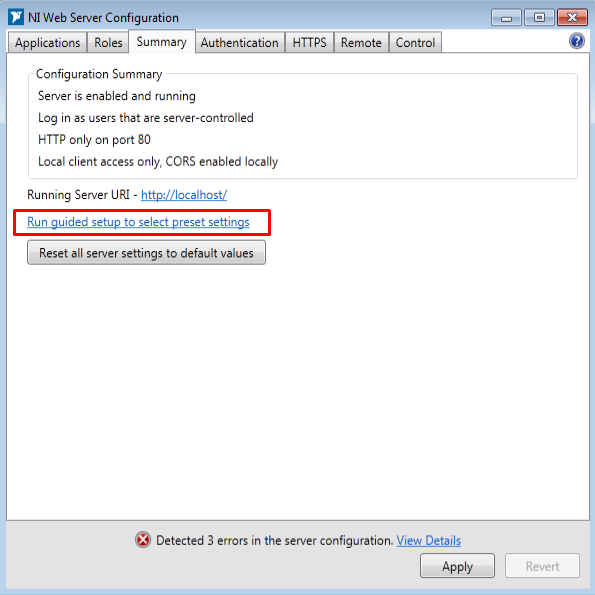
- Run through the setup wizard using ‘Simple Local Access’. By default port 80 will be configured
Host the built Web application
- Copy the built components into ‘C:\Program Files\National Instruments\Shared\Web Server\htdocs‘ as shown below
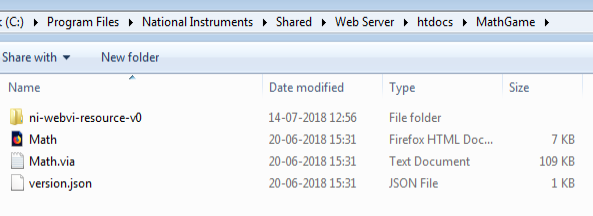
- Now access the web page from browser using ‘http://<ipaddress>:<portnumber>/<Folder name inside htdocs>/<HTML file name.html> . for example: http://localhost:80/MathGame/Math.html
Note: To host the web app in NI SystemLink follow this procedure
Source Code is available on GitHub – Download / Contribute / provide feedback
Have fun with NI Web Technology!
Share and Subscribe to my future blogs

NI Web Technology: Monitor and Control Systems - Boring Engineer
[…] develop this, you need to know LabVIEW, LabVIEW Web Service, NXG Web VI basics. Once learned, it will only take a few hours to develop this application. I have explained the […]
Web Monitor and Control application using NI SystemLink APIs - Boring Engineer
[…] and heater state data from LabVIEW VI is being continuously published to the Web page built using WebVI. I have embedded the quick demo of application through a […]