Gardening enthusiasts and tech-savvy individuals, get ready to embark on a journey where nature meets technology! In this do-it-yourself (DIY) guide, I will walk you through the process of creating your very own Raspberry Pi-controlled desktop garden. This project allows you to monitor and control your plants’ environmental conditions, ensuring they thrive with precision. With clear instructions and a dash of creativity, you’ll have your own green oasis right on your desk. Let’s get started!
Here is a shot demo from Anannya on Pi Controlled Desktop Garden
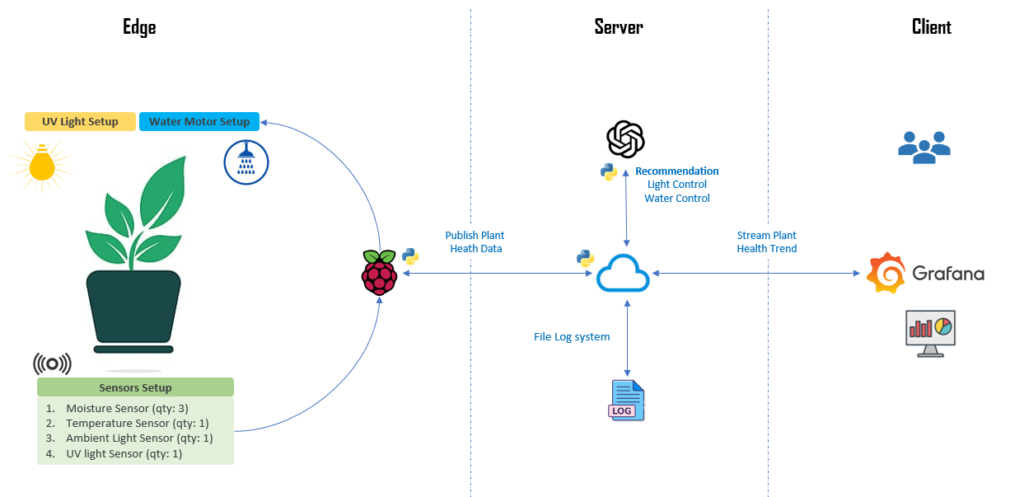
System Diagram
What You’ll Need
To begin this exciting project, gather the following materials:
- Raspberry Pi 3B+
- 4 Channel 5V Relay Module
- 4 Mini Water Pumps
- 4M Vinyl Tubing (Material: PVC)
- 4 Capacitive Soil Moisture Sensors (TL555C)
- UV & Ambient Light Sensor (LTR390)
- DS18B20 Temperature Sensor
- MCP221A ADC to convert moisture sensor analog to digital values
- DOMMIA Grow Light
- myTouchSmart Indoor Digital Timer Switch
- Prototype PCBs, Male-Male, Male-Female Wires, Solder Kit (as required)
Hardware Connections
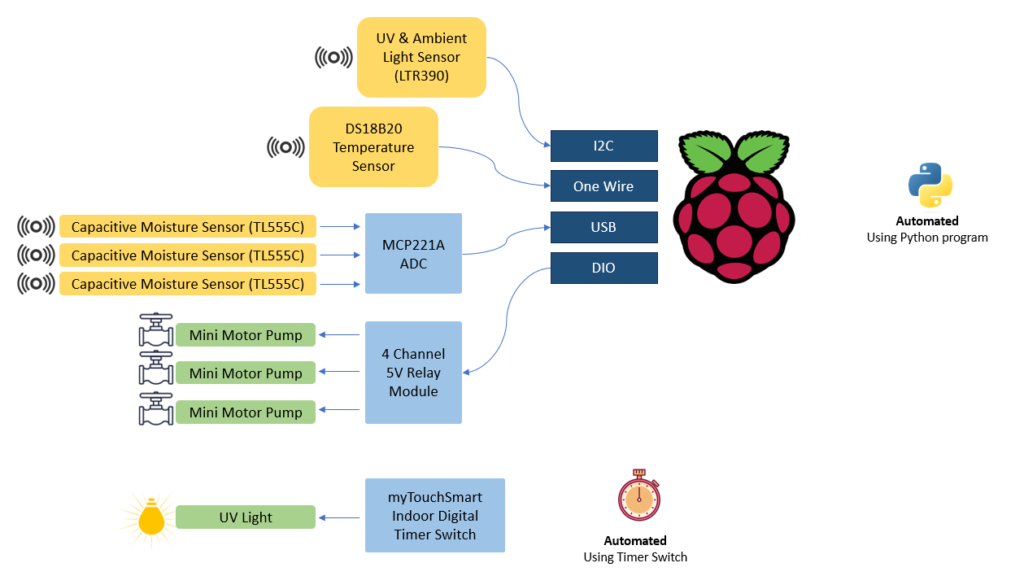
Now, let’s connect the hardware components to create your smart desktop garden. Follow these steps:
- Connect the sensors with digital output directly to the Raspberry Pi through I2C or One Wire pins.
- For the analog sensor (Moisture), use the MCP221A to convert it into digital data, and then connect it to the USB interface of the Raspberry Pi.
- Control the water supply with the mini motor pump, and use the relay module connected to the Raspberry Pi’s GPIO pins to turn the pump on and off.
- Manage UV light exposure by using a timer switch to turn the UV light on and off during specific times of the day.
- Your Raspberry Pi will run a Python program (check the GitHub repo) to acquire data from the sensors and control the relay.
Streaming Plant Health Data to the Cloud
To keep track of your plants’ health, we’ll set up data streaming to the cloud. Follow these steps:
- The Raspberry Pi will run a Python program that reads sensor values every minute and publishes the data to a web service hosted on Heroku through REST endpoints.
- The server Python code, using the Quart framework, will receive this health data. You can find the code in the same GitHub repository.
- The Heroku web service saves the received data to a file for analysis and tracking.
Viewing Live Data in the Dashboard
Now, you can visualize your plants’ health data with a user-friendly dashboard. Here’s how:
- The Heroku web service provides an endpoint for clients to access the health trends of your plants.
- Install Grafana on any machine (cloud or client) and create a dashboard to view different sensor trends over time.
Technology Used
Here’s a quick overview of the technologies used in this project:
- Front End: Grafana (for visualizing time-series sensor data)
- Backend: Python 3.11, Quart framework for the web service (hosted on Heroku)
- Hardware Controller: Raspberry Pi 3 B+ and Relay Module
- Sensors: Moisture Sensor, Temperature Sensor, UV sensor
- Actuators: UV light, DC Motor
Now that you have all the information and materials you need, it’s time to roll up your sleeves and create your Pi-controlled desktop garden. Enjoy watching your plants thrive as you combine nature with the power of Raspberry Pi technology. Happy gardening!
Leave a Reply